
I had seen an article in Fine Woodworking magazine a couple years ago that showed a couple of beams being used on sawhorses for all the typical workbench tasks. The ones in the article were torsion boxes made of melamine and homasote, and I was all set to make these until I got the "workbench bug" like so many other woodworkers out there. After reading - obsessing really - about historical bench designs, I wanted to go in a more traditional direction and make a solid bench top with dog holes to enable the use of dogs and hold fasts.
Some bench designs such as Bob Lang's 21st Century bench have a large tool tray between two separate sections of their top. From this, I realized I could just make two slabs and not have to muscle around one large top. When the two slabs are butted up together, my bench top is 20" deep. If needed I could also move the back slab toward the rear and get a deeper top by leaving a 4"-6" gap between the slabs.
The final piece dropped into place at Woodworking in America. Megan Fitzpatrick was kind enough to take me backstage and show me her "Gluebo" bench on the last day of WIA. According to the Internet, the LVL she used is lighter than other lumber I was considering, such as Southern Yellow Pine (SYP). LVL comes in around 37 lbs/cubic foot, and SYP is 41 lbs/cubic foot. On top of that, LVL makes a stiffer beam so you can get away with a thinner top. Like Megan's LVL benchtop, my top is a little over 2 1/2" thick. Each LVL beam weighs about 45 lbs compared to a 4" thick beam of SYP which would be about 80 lbs.
The LVL makes an attractive top, but there are a few things I noticed when working with it. The front and rear edges of the bench were pretty ugly since the plies of the LVL were exposed. I ended up putting a 3/8" thick strip of maple on the front and rear edges of both slabs. This makes it look better, but it also protects the long edges of the LVL beams which have a bad tendency to split and break off at the edges. You will want to chamfer the edges of the slabs if you don't wrap them as I did. The LVL also had a few voids but some careful layout allowed me to flip most of these down onto the bottom of each slab.
To attach the beams to my base cabinets, I am simply relying on gravity and "bullets". The bullets are made from 3/4" dowels with slightly rounded ends that help line each slab up with pre-drilled holes in the top of the base cabinets.

When it is time to go to work, I just wheel out the base cabinets (more on that next, I promise!) and tilt the front slab onto the cabinets. I put the bullets into the bottom of the slab first because the hole in the cabinet top goes all the way through so setting the top down could just knock the bullet through the top of the cabinet. It was a little fussy to get the holes lined up perfectly between the slab and the base, so you may notice an extra hole on the left that I plugged up after the fact.
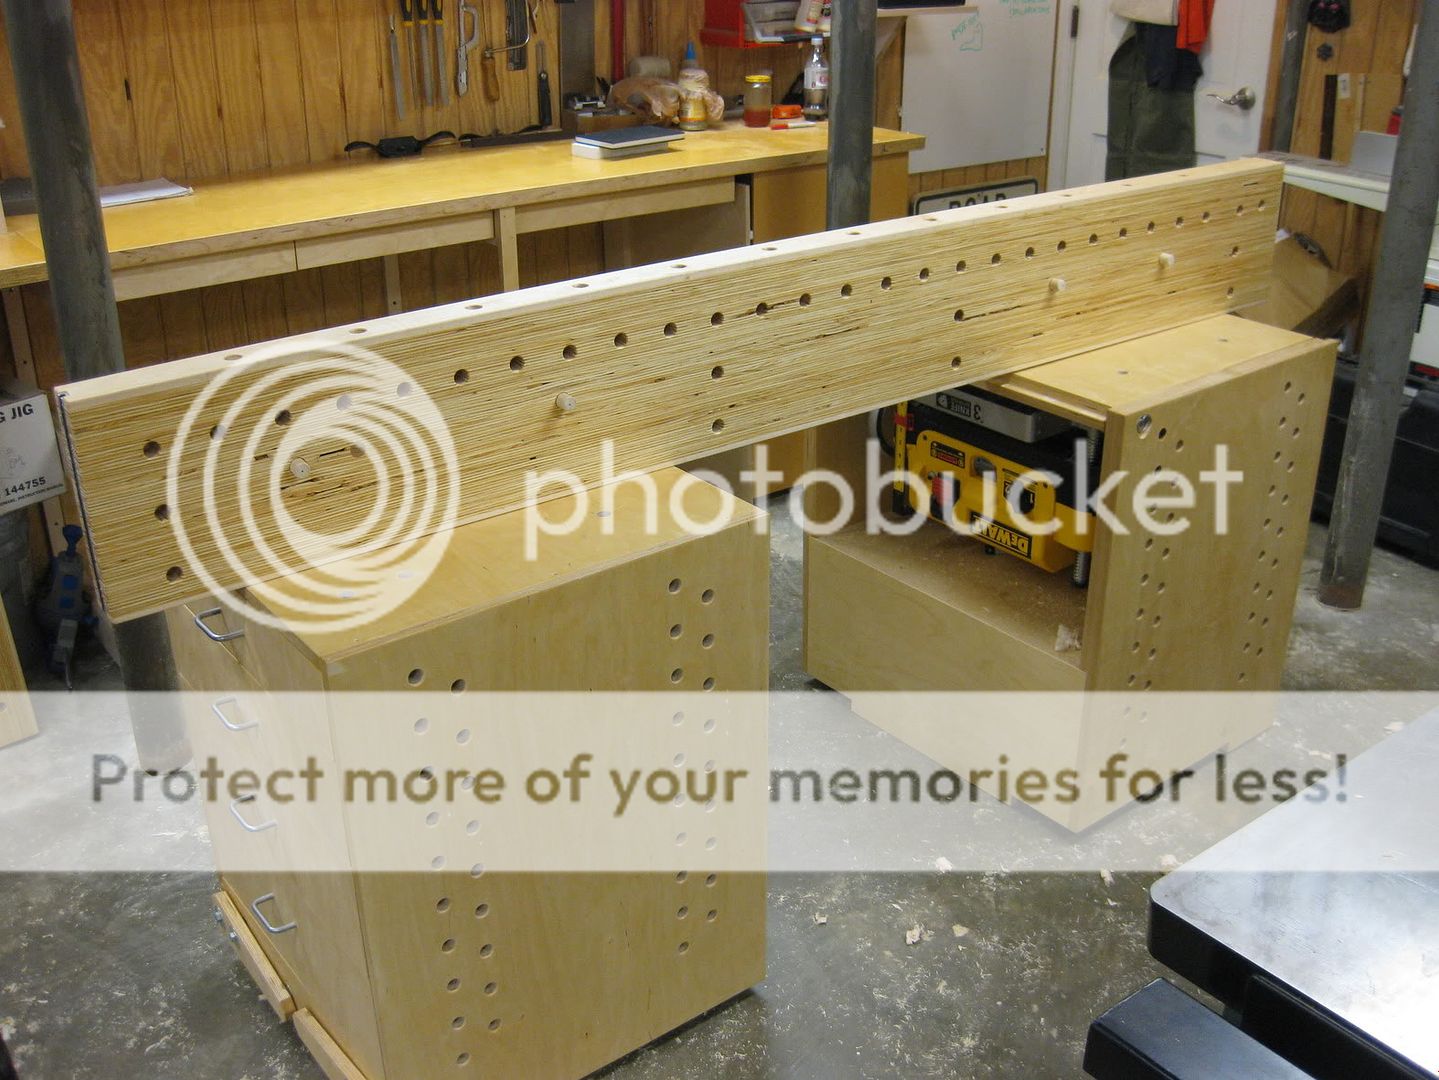

After the first slab is in place, I just get the second one up there and drop it in place. The bullets are a little tight at first but after you use them a few times the fibers compress and the slabs just drop right in place.

With both slabs in place, the bench is very solid. The top doesn't shift around at all, and the two slabs butting up together seems to really lock them in place. The bases are pretty heavy, especially the one with the planer inside. Even during aggressive hand planing, this bench doesn't move or slide around.

The only negative I have noticed is that the slabs may not sit fully down onto the bases, because my floor is not level in the garage. There are a couple spots on my concrete floor that are really wacky, so there can be a small gap between the slab and the base cabinets, shown in the next picture.

This would be a problem with any bench, requiring me to level the feet to prevent rocking. To account for the warped floor, I specifically made the base cabinets so that they will not rock on unlevel floors - but more on that next time. The good news is that even with a small gap under the top slabs, the bench is still extremely solid and stable, just not always level. I planned to use a deck of cards to shim up the top under the raised end, but in practice this doesn't seem to be needed.
So that's how I came up with the top for the bench, and how it works. Next time, due to popular demand I'll show the bases and how the retractable wheels work. Stay tuned!
I'm curious to know if anyone else has tried using LVL or another "wood product" for their bench top. Come on Dyami, tell us about that Timberstrand!
4 comments:
Inspired!
Arron,
Thanks for the great explanation of your top. Looks great. I think it'll make a wonderful long term bench until you can evict that Buick from you shop (did you know it's not made of wood?).
Regarding Timberstand, while I haven't used any of it in action yet, so far I've made a mock benchtop slab of it, and the slab is holding up wonderfully in my lumber rack. It hasn't warped in over a year of NY temperature and humidity swings. I'm presently working on designing and fabricating a bench base from it. Today I was finally able to assemble my first frame assembly. What I can say at this point having worked with the Timberstrand quite a bit is that it mills easily. I've been pleased with the results of jointing and planing it (I have the same Jet 6" jointer & DeWealt 13" planer). When milling it it is much like LVL's in that the face and edge "grain" are distinctly different. Timberstrand is dimensional lumber manufactured in the same way as OSB. Like OSB, the strands are oriented along the length of the board and are all arranged co-planer with the face of the board. The result is that milling the face results in minor tear out and small voids, while milling the edge results in what resembles a tight grain pattern with very few gaps. As the bench slab face is all edge "grain" it looks and feels fine. Though the face "grain" is exposed in the legs I'm building, even with the tear out they remain flat and smooth. No one ever said Timberstrand would be pretty, so I'm not letting it bother me.
I've read Chris Schwarz's comments about crushing the face of the LVL's with the leg bolts. While that is certainly possible, I suspect the biggest problem is that the legs are subject to a great deal of racking forces and proper precautions were not taken to prevent the nuts from loosening. Chris has mentioned adding lock washers to the assembly. If I was bolting together a bench base I would use lock washers, lock nuts and locktite, regardless of the material the base is made of.
I'll try to keep up my blog as I assembly the bench (be forewarned, it will be a slow process). In the mean time, I can't wait to hear about your wheels and how you keep your bases flat. Thanks for sharing, Aaron.
Thanks for letting me call you out by name, Dyami. I have been wondering what you thought of the Timberstrand, thanks for taking the time to reply. Sounds like Timberstrand has many of the same properties as the LVL. I am really liking the exposed "edge" grain on the top face of my slabs more and more each day.
Thanks again for responding!
That is a great idea. I like the fact you can tear it down. I, like you have a garage workshop in which i need to park the cars in so break down is a must.
Post a Comment