Wednesday, December 29, 2010

Workbench: Planing Stop

Here's an old idea you've seen before, perfect for a lazy blog post on December 29th.  At the left end of my weirdo no-vise workbench I installed a planing stop.  It's just a half inch thick piece of Baltic birch plywood I had in the scrap bin, attached to the end of the bench with some T-Track and a couple knobs.

Planing stop works great at the left end of the bench
It was a little tricky to come up with a way to cut the groove in the end grain of the top slabs.  I considered (and even started) doing it with a handsaw and chisel, but the results were pretty horrible.  Next, I actually stood the bench slab on end and rigged up a superbly unsafe router jig.  In the picture below, you can see that (1) I am an idiot, and (2) that my wife's car is not in the shot. I am at least clever enough to behave foolishly while she is away from home.

To my wife: I swear I didn't do it this way
Thankfully, common sense took back over and I stepped away long enough to come up with a simpler solution involving some double-sided tape, a scrap of wood, and both feet planted firmly on the ground.

Routing a groove for T-Track
Once the groove was there, it was simple to cut some T-Track to fit the two bench slabs.  A few screws later, and the track holds a couple T-Bolts with handles from Highland Woodworking.  It's so convenient to have them right around the corner from me, but pretty dangerous for the wallet too.

Planing stop attaches with a couple knobs - easy to adjust.
Voila! One removable planing stop.
I like this solution because it is simple to use, and also because it fits my theme of having a bench that breaks down daily.  When it's time to quit, the planing stop board pops free, and the knobs just slide right out of the track and into a drawer.  Most of the time the parts stay in the drawer, since I don't use the planing stop every day.

Have a happy New Year!

There are other options for planing stops too.  What do you have on your bench?  Or do you just flatten boards with a planer like nature intended?

Thursday, December 16, 2010

Blast from the Past: Wire Trick

As I have said in the past, the many volumes of the Popular Mechanics d-i-y Encyclopedia are fascinating to read.  They offer a glimpse into the shops of our fathers and grandfathers, where throwing out even a single useful scrap was frowned upon.  I'm sure that there was more than one basement workbench crowded with jars of bent nails waiting to be straightened.

In between the regular entries in the Encyclopedia, there are pages dedicated to simple tips and tricks.  Some of these "Clever Ideas" are pure gold, and we are starting to see them come back around today during our collective re-awakening to hand tool use.  For example on the page shown below at the 9 O'clock position we see that adding a leather strip to the inside of a vise makes a better working surface.  This trick is repeated even today by the most revered workbench gurus of our generation.


There are a couple other tips on the page that wouldn't be out of place in one of the magazines on today's newsstand.  A modified sawhorse used as a table saw outfeed?  Check.  Add scrap to a shelf to let you easily paint each side?  Check.

Then you get to the last trick on the page, in the bottom right corner.  How to straighten bent wire with an ingenious little jig.  I can imagine my grandfather bent over his bench, pulling a 2 foot section of wire through a few nails.  Many folks would agree that the generations alive in the 1930's adapted these habits out of necessity during the Great Depression.  I wonder though - when did this thriftiness leave us as a nation?  Was it purely generational, like flipping a switch?  Or did it slowly fade away until more and more shop supplies were purchased as needed from the shelves of the big box stores?  I wonder if you mapped it out on a timeline if you would find that in 1983 it was already fine to throw away wire, and we were in the last days of hanging on to bent framing nails.

Today it seems silly to keep those jars full of leftover screws, hinges, razor blades, brad nails, picture hooks, doorknobs, light switch plates, bent springs, washers, non-programmable thermostats, kitchen cabinet handles, rubber feet, and of course wire.  I don't have a whole bench full of the stuff like my grandfather did, but there is that one jar.  You know the one. It's in the back corner of the top cabinet over your bench.  The one that sometimes saves the day with a long forgotten bit of scrap, just the right size and shape.  As if it's been waiting like some little bit of magic for you to remember.  When that happens, I can't help but think out loud "Thanks, Gramp."

What is the weirdest thing you can't throw away? Are you a hoarder or a minimalist in your shop?

Tuesday, December 14, 2010

Tail vise? I Wonder.

Wow, the titles to these posts are getting silly.  In this case though it's accurate also.  There is no tail vise on my bench.  Blasphemy!  For that matter, there is no face vise either, but we'll get to that later.

Because of my desire to break down the bench for daily storage, I challenged myself to come up with work holding solutions that don't require vises permanently mounted to the bench top.  Vises add weight and complexity, and the good news is that with a few accessories they aren't needed.  Hey, I'm not saying I wouldn't love to have a nice Benchcrafted Tail Vise, but it's not going to work on this bench.

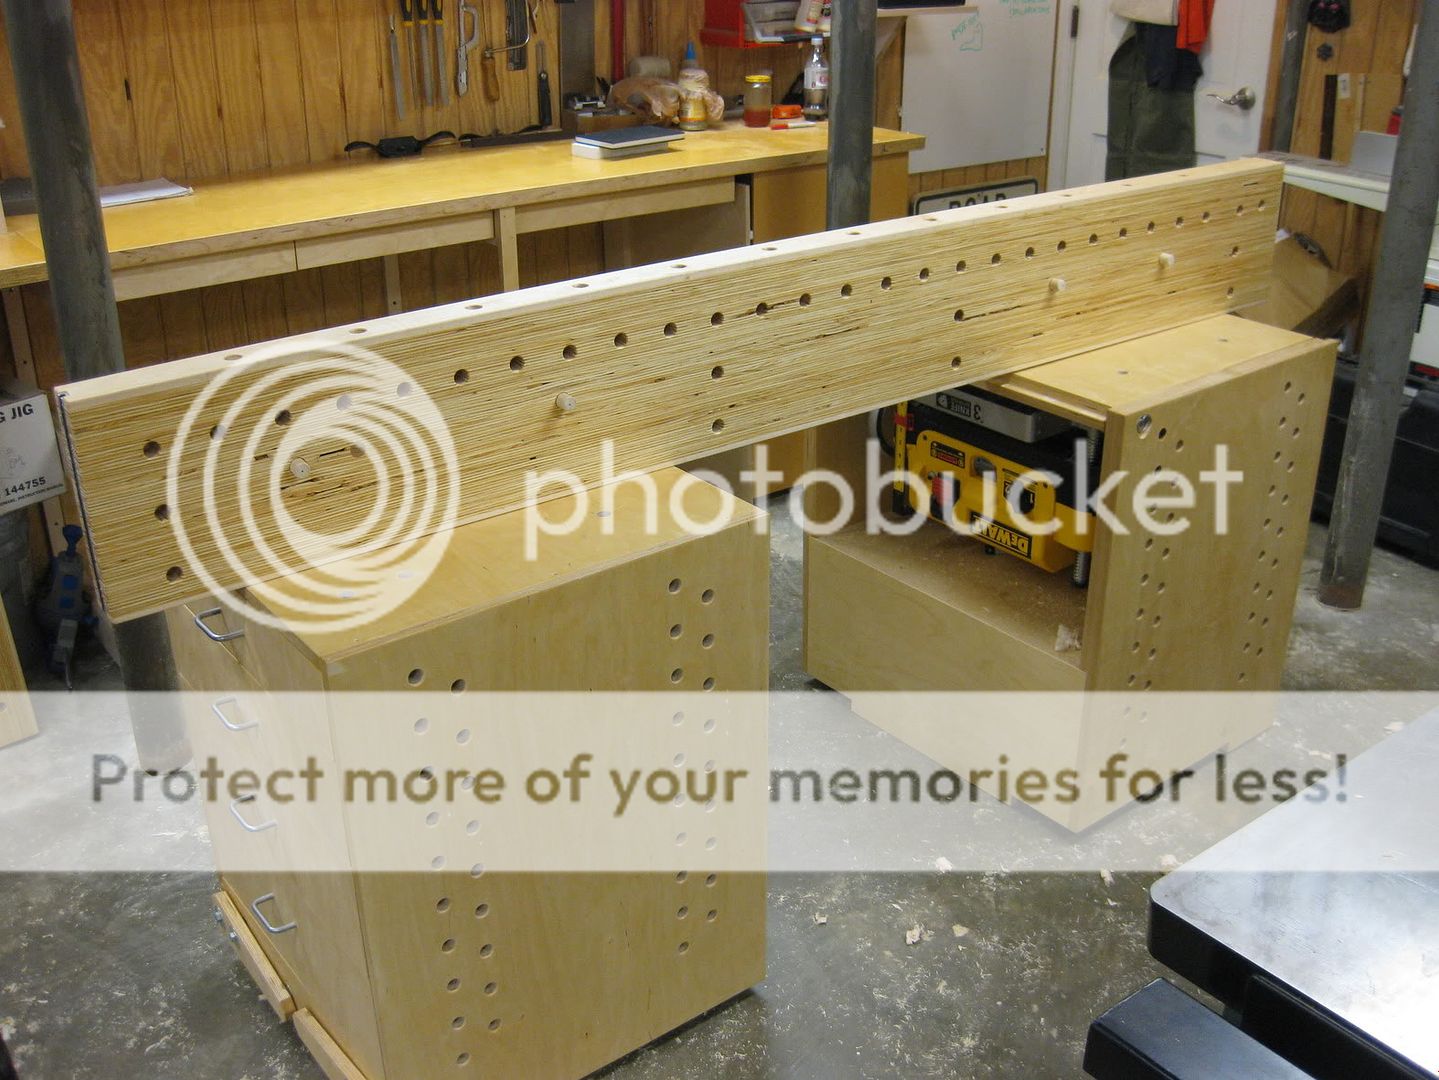
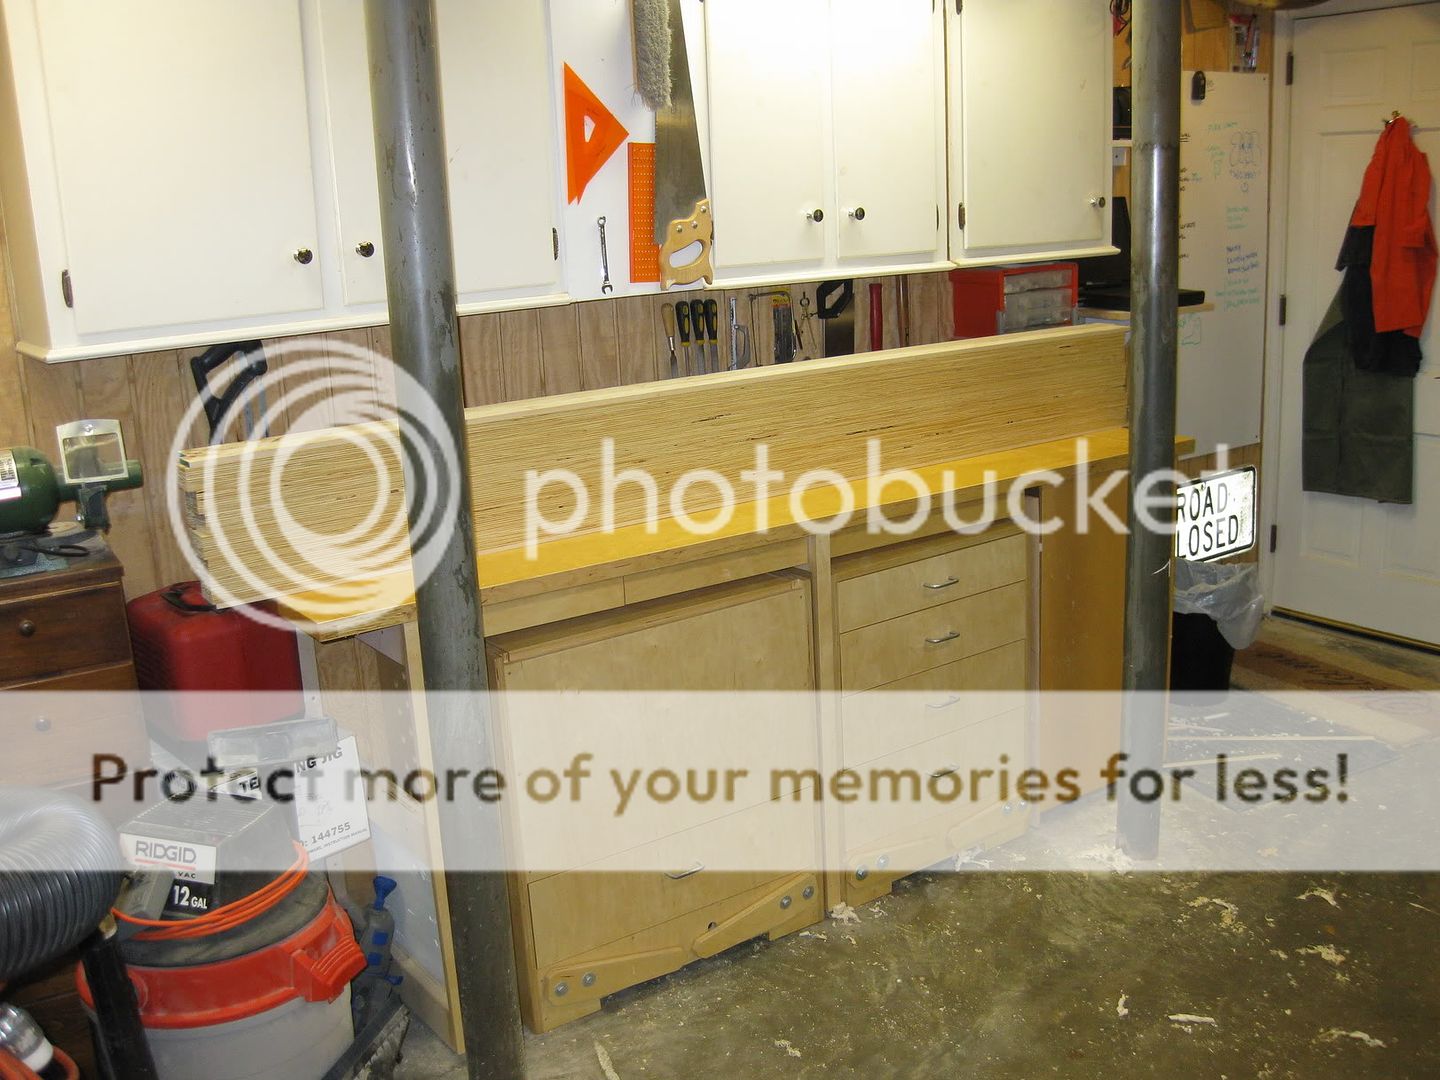
If you haven't been following along, here is the bench in all its naked vise-free glory.


For the tail vise duties, I turned to a Veritas Wonder Pup.  This is a clever little gizmo that seats into a standard 3/4" dog hole.


I chose the the Wonder Pup because it has a shorter shaft than the Wonder Dog, so I can use it in any hole in the bench without hitting the cabinets below.  Both version have a total range on their screws of about four inches, so as long as your dog holes are closer than that you have total coverage to hold any length board.  In the picture above you can see that the first hole in the front corner is about three inches in from the end of the bench.  This is helpful because the handle of the Wonder Dog will overhang the end of the bench and be easier to spin quickly.  The screw pitch is fairly tight on these, so for big adjustments I hold the Wonder Pup by the screw and shake it around until the shaft spins around like a hula hoop.

To hold a workpiece to the bench, just put a regular bench dog at the other end and use the Wonder Pup to apply pressure.  As you can see below, even with thin stock the dog can be adjusted low enough to be out of the way.  By the way, I don't ever plane 1/4" thick plywood.  This is just to show the options for holding thin stock.

It's possible to get a bench dog low enough to hold 1/4" thin material.

Even among fans of the Wonder Dog, they will agree that it isn't great for working with thin stock.  The block on the end is 5/8" thick so it works fine for 3/4" or thicker material.  You often see the suggestion to add a thin tapered block to the end of the Wonder Dog, and the two screw holes in the block make this possible.  You also sometimes see the suggestion to add support shims underneath a workpiece to hold it up higher off the bench, but the difficulty is needing a lot of different thicknesses and widths to support different sized boards.

The standard Wonder Dog isn't great at holding thin stock.

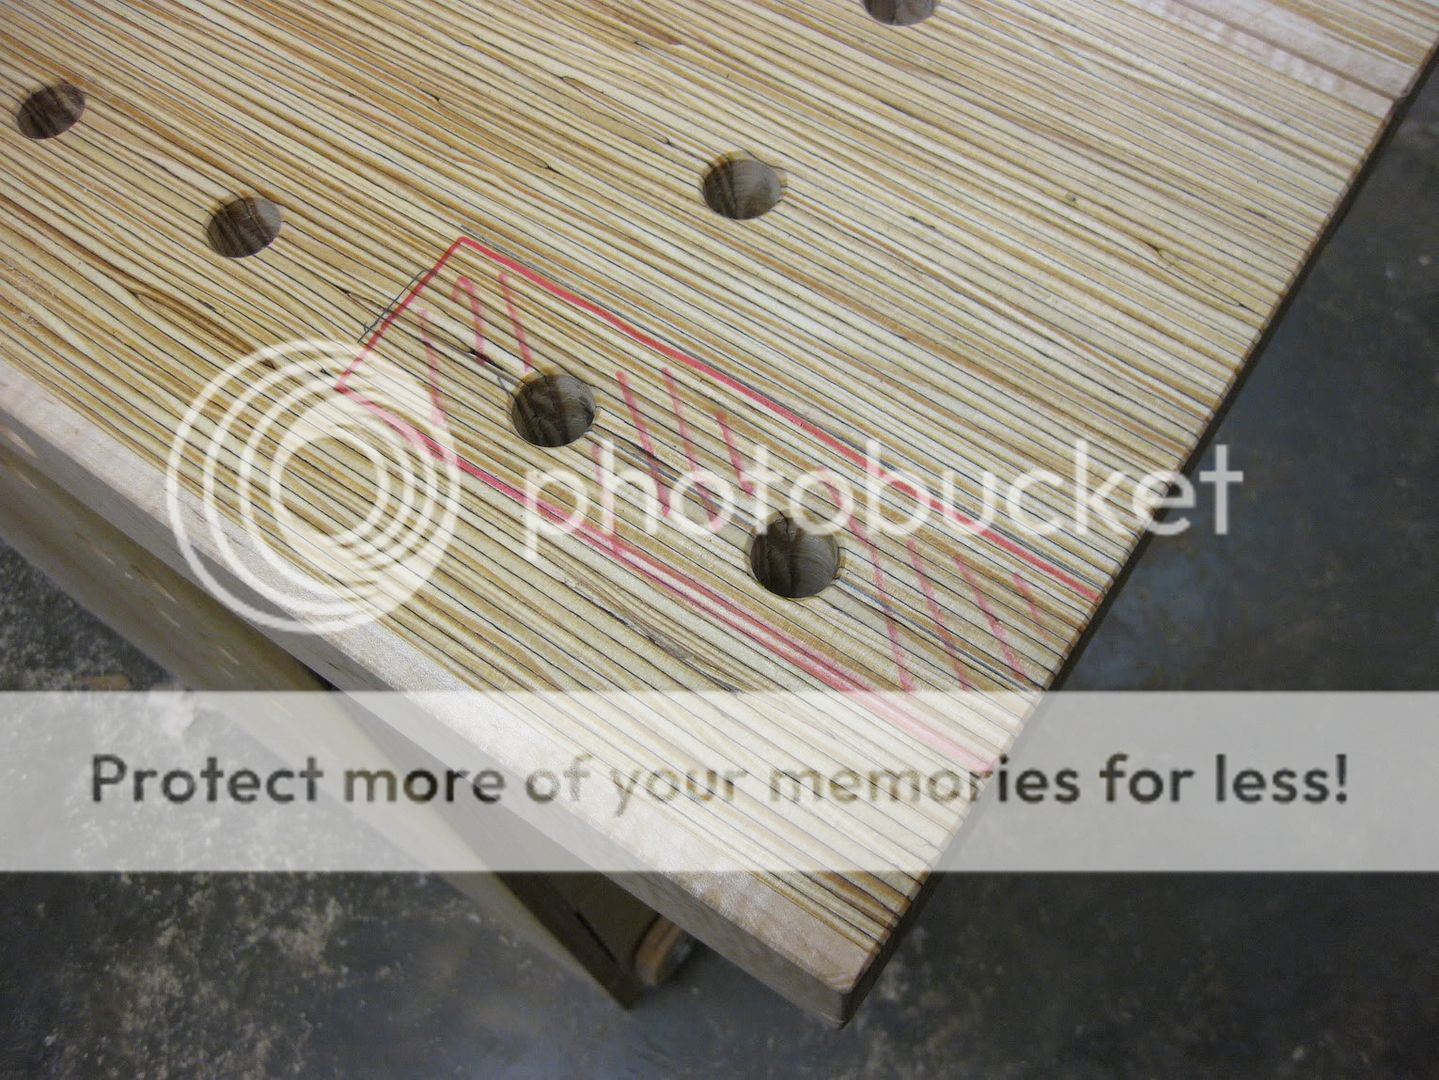
All of the information above is old hat if you have read about workbenches elsewhere.  This is where I am going to take you off the beaten path.  Instead of messing around with shims or tapered blocks, I recommend making a shallow pocket in your bench top for the Wonder Dog to sit in.  Here is the outline of the pocket, just slightly wider than the head of the Wonder Dog.  The total length is about 7 inches so that both dog holes can still be used.

The plan is to remove the area marked in red.

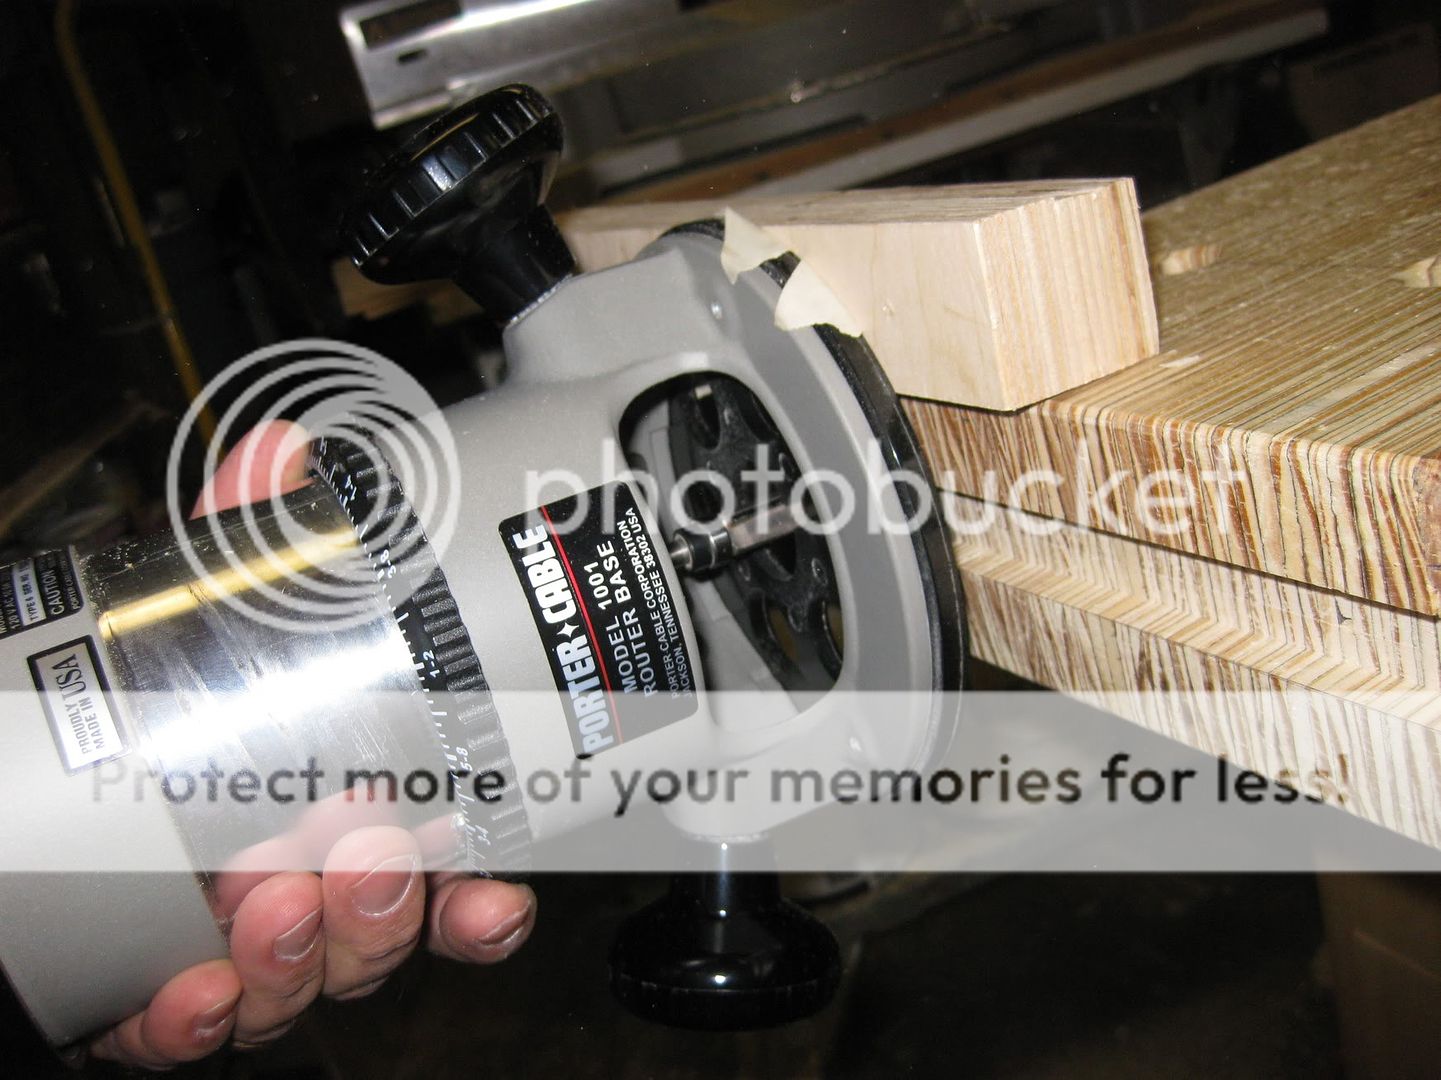
To make the pocket, I made a quick router template.  I hogged out most of the material with a straight bit, then finished up with a dovetail bit around the edges.  This creates a sliding dovetail so that I can use a filler block in the pocket when I don't need it.  I used an 8 degree dovetail bit since I was trying not to undercut the LVL too much.  In a standard hardwood bench I don't think the angle would matter.

Use a router to create a sliding dovetailed pocket in the end of the bench.

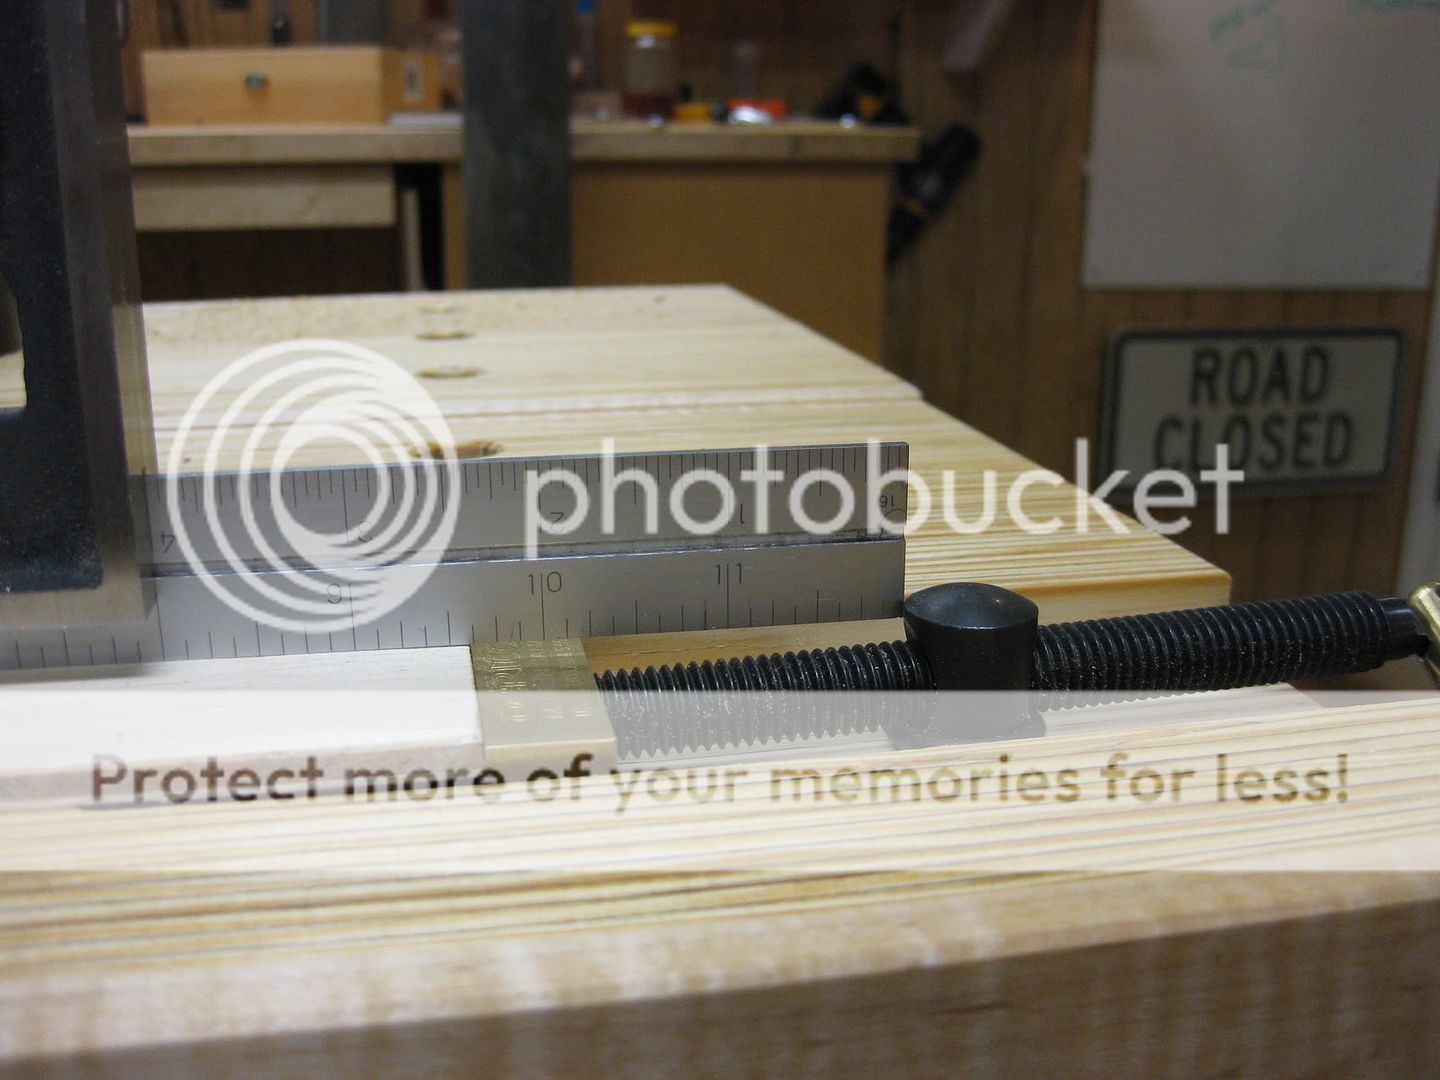
The pocket is 1/2" deep, so the head of the Wonder Dog sticks up only about 1/8" above the bench surface.  This is adjustable, so you could of course raise the whole assembly to get anything between 1/8" and 5/8'.  With this pocket, the Wonder Dog is able to clamp thin stock like a champ.

Wonder Dog + 1/2" deep pocket = thin stock clamping goodness

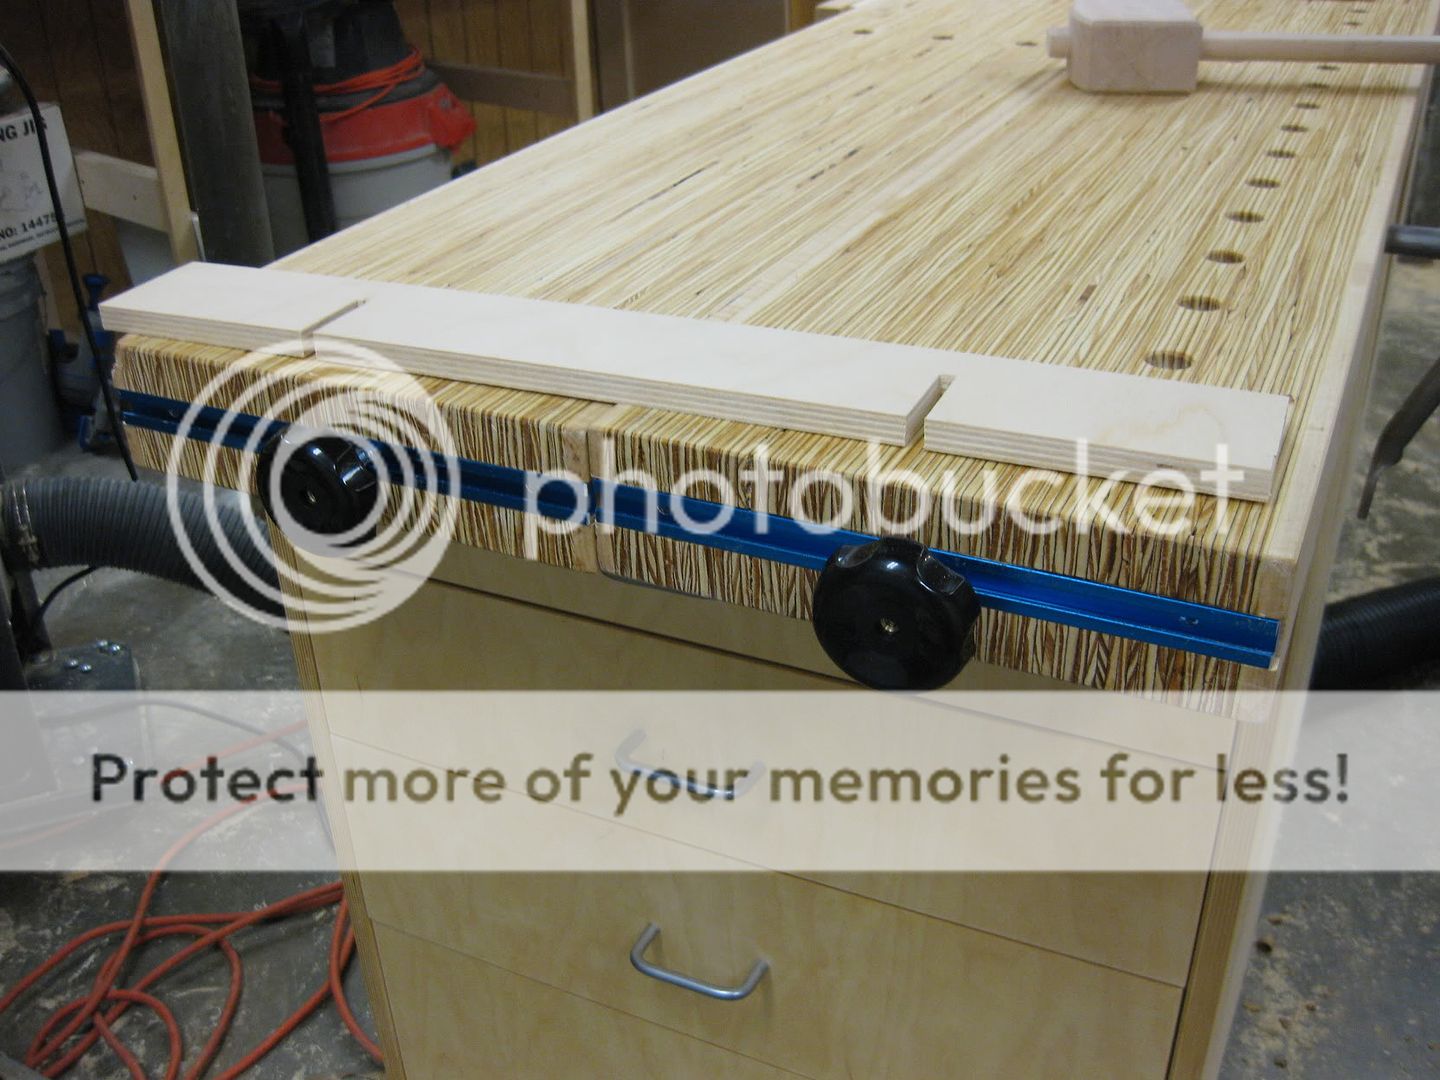
The next trick is to make a filler block to close up the pocket when it's not needed.  Thanks to the dovetailed sides of the pocket, this can just slide in from the end of the bench. I made a block out of some Ipe in my scrap bin, but any hardwood should be fine.  I cut the block on the table saw to get the 8 degree sides and snuck up on a nice friction fit with a hand plane and scraper.

Filler block should be a nice friction fit
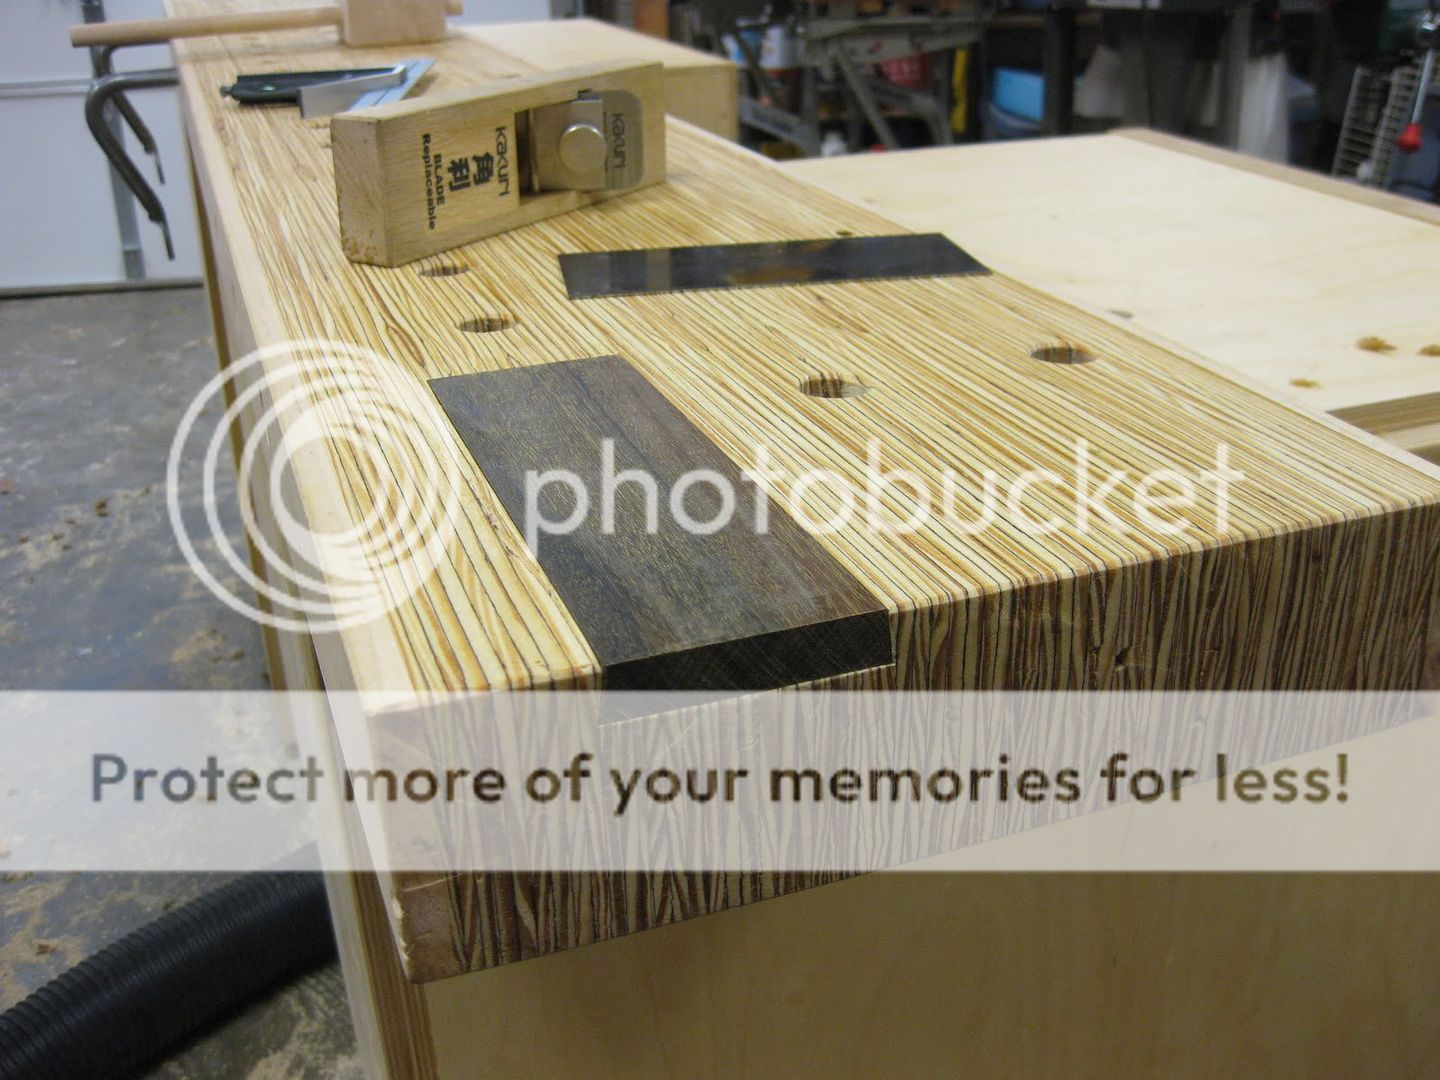
The block will be easier to slide after the two holes are drilled in it.

After I had the block fit correctly, I used a forstner bit to mark the locations of the dog holes from under the bench.  Then just drill the dog holes in the filler block and chamfer the edges of the holes.

This little modification really helps get rid of a big limitation of using the Wonder Dog as a tail vise.  When you want to work on thin material, just slide out the filler block.

Holding thin stock - filler block removed

Most of the time the filler block stays in the pocket, and the Wonder Dog works normally.

Filler block does not affect normal operation of the Wonder Dog

There are a couple other tips I can give you.  If you are trying to plane a thin board that is also less than two inches wide, you may find that the end wants to sink down into the pocket since it is unsupported.  For this, I kept a little offcut from the filler block and put it in the pocket to support the workpiece.  I haven't ever needed it, but I keep it in the drawer just in case.

Narrow boards may need a little support to keep them out of the pocket

One last thing about the Wonder Dog is that the top of the anchoring shaft sticks above the holding block.  This can interfere with planing, even on 3/4" thick stock.  This is another great reason to use the pocket even on thicker stock - to get the shaft out of the way of a plane.  It's not all that problematic though since most right-handed woodworkers will plane away from the shaft.

Top of the shaft can interfere with planing

I'm not suggesting that this little modification makes the Wonder Dog the perfect tail vise. For a permanent bench I would probably still consider a more traditional tail vise, just for the convenience.  For me though, this is a good enhancement to make the relatively cheap Wonder Dog perform a new trick. Sorry about that.

What type of tail vise does your dream bench have? Next time, more bad puns!  Thanks for reading.

Tuesday, December 07, 2010

Workbench: Floating Bases

One of the key features of my workbench is the ability to take it apart and store it away quickly.  Like every guy with a small shop, I am trying to put all my stuff on wheels.  I came up with the idea of using base cabinets under my workbench instead of the more typical sawhorses.  The bases are an important part of this design, both for workholding and for stability.  They needed to be mobile but still sturdy enough to support the benchtop with all the forces from planing and pounding.

The retractable wheels on the bases allow me to quickly roll the cabinets under a stretch of countertop and get them out of the way.  When it's time to use the bench, I just wheel them out again.

I have two cabinets, one slightly smaller than the other.  Here is a picture of the small cabinet, with a bunch of drawers.  The height is just right for me, so that adding on the top slabs makes a workbench that is 34" from the floor.


Here is how the retractable wheels work, courtesy of SketchUp.  Way easier to show you this than to flip over the real thing!


I made a few changes when I built the cabinets, but these pictures give you the general idea. Underneath each base cabinet is a recess that is about five inches deep.  Inside, there are two casters on each side, mounted to a pivoting board.  This "wheelie" board is attached to the bottom of the cabinet with a couple standard door hinges I had laying around, but any strong hinge will do.  The hinges are shown in red above, and the yellow circles are there to remind me that the casters need to be able to spin freely. Don't put them too close to the corners.

Here it is right-side up, it is easier to see how the levers work in this view I think.


The levers are mounted with a couple bolts through the front apron of the cabinet and into the "wheelie" boards.  When you want to lower the wheels, just step on the end of the lever and the wheels get forced down which also raises one side of the cabinet off the floor.  These have a surprisingly strong lever action, and are able to lift up very heavy loads - at least a couple hundred pounds.  I suppose it depends on how much force you can get into the lever by stepping on it, but I have been eating my Wheaties and am well over 200 lbs.

But what keeps the wheels down?  Aha!  Take a look at the next picture.


Scrounging my pile of spare parts, I put a couple of door latches into the bottom apron.  When you step on the levers, they move down and the latches pop out to hold them in place.  Now you can wheel the cabinet around and when you are done, just give the latches a kick with your toe to drop the cabinet back down onto the ground.  These latches are cheap, and you can also buy just the latch at the big box stores.

In the picture above, you can see a hint of the arc that is cut out of the apron around each bolt - above bolt #3.  The bolts for the levers just pass through the apron and into the "wheelie" board.  You may also notice that one of the levers is lower than the other.  There is some flex in the wheelie boards, so when I was ready to add the latches I just cranked down on the levers until there was a quarter inch of clearance all around, especially in the back of the cabinet.  I then marked a line and this is where the latches ended up. I also made the apron removable in case things sag over time and I need to make a new one.

I have mentioned before that my garage floor has more waves than the Atlantic ocean.  In order to prevent the cabinets from rocking when they are dropped, I made them with three feet.  You can see that in the SketchUp pictures above, or in this picture of the back corner.


Once the cabinets are dropped down in place, they are very stable.  Not necessarily level, but stable.  This was pretty important since I don't want the bench to rock back and forth.  These things aren't going anywhere, since they are both pretty heavy.  The larger cabinet is about 30 inches wide and has my 13 inch planer mounted on a flip top, so that cabinet has to be almost 200 pounds with all the plywood and the planer.  The drawer unit is lighter, but I would still estimate it at over 100 pounds.  Add in 90 pounds for the top slabs and I've got a 400 pound bench that wheels away easily.

Here are some things I learned when building the retractable wheels, in case anybody wants to try this.  The drawings show the "wheelie" boards as 3/4 plywood, but this has a lot of flex when the wheels are up.  I had to do some weird stuff to stiffen the boards like you might do along the front edge of a shelf.  I recommend gluing up a double-thick board that is 1 1/2" thick, but I would use plywood again with no problems.  In order to do this, you need a slightly deeper recess under the cabinet.  I was trying to save every last bit of vertical space, and it got a little tight for me.  It's based on the height of your casters - with a 1 1/2" thick wheelie board, your recess should be at least 2 1/2" deeper than the caster height.  Plan to get the wheelie board roughly level with the floor when the wheels are down, though a little tilt is fine.

Next time I'll talk about some workholding stuff.  With a few accessories, I don't even care that this bench has no vises.

What next?  I've got more to talk about with the bench, but do you have a question?  Put it in the comments!

Sunday, December 05, 2010

That is one sexy box!

Not what you may have expected, but I got home from a work trip on Friday to find this waiting for me courtesy of the UPS guy.


Inside that, the exitment just keeps getting better!


Finally, this is what was inside. 


Excuse me now, I have to go play in the shop.  I'm grinning like a little kid with an ice cream cone.

Thursday, December 02, 2010

Workbench: About the Top

For the top of my new workbench, I needed a solution that would let me take the bench apart easily at the end of the day.  What I eventually ended up with are two 10" wide slabs of LVL.  They are 7 ft long and a little over 2 1/2" thick.  The seven foot length is about as long as the beams can be since I want to stand them up on end for storage and I have a low ceiling in the shop.

I had seen an article in Fine Woodworking magazine a couple years ago that showed a couple of beams being used on sawhorses for all the typical workbench tasks.  The ones in the article were torsion boxes made of melamine and homasote, and I was all set to make these until I got the "workbench bug" like so many other woodworkers out there.  After reading - obsessing really - about historical bench designs, I wanted to go in a more traditional direction and make a solid bench top with dog holes to enable the use of dogs and hold fasts.

Some bench designs such as Bob Lang's 21st Century bench have a large tool tray between two separate sections of their top.  From this, I realized I could just make two slabs and not have to muscle around one large top.  When the two slabs are butted up together, my bench top is 20" deep.  If needed I could also move the back slab toward the rear and get a deeper top by leaving a 4"-6" gap between the slabs.

The final piece dropped into place at Woodworking in America.  Megan Fitzpatrick was kind enough to take me backstage and show me her "Gluebo" bench on the last day of WIA.  According to the Internet, the LVL she used is lighter than other lumber I was considering, such as Southern Yellow Pine (SYP).  LVL comes in around 37 lbs/cubic foot, and SYP is 41 lbs/cubic foot.  On top of that, LVL makes a stiffer beam so you can get away with a thinner top.  Like Megan's LVL benchtop, my top is a little over 2 1/2" thick.  Each LVL beam weighs about 45 lbs compared to a 4" thick beam of SYP which would be about 80 lbs.

The LVL makes an attractive top, but there are a few things I noticed when working with it.  The front and rear edges of the bench were pretty ugly since the plies of the LVL were exposed.  I ended up putting a 3/8" thick strip of maple on the front and rear edges of both slabs.  This makes it look better, but it also protects the long edges of the LVL beams which have a bad tendency to split and break off at the edges.  You will want to chamfer the edges of the slabs if you don't wrap them as I did.  The LVL also had a few voids but some careful layout allowed me to flip most of these down onto the bottom of each slab.

To attach the beams to my base cabinets, I am simply relying on gravity and "bullets".  The bullets are made from 3/4" dowels with slightly rounded ends that help line each slab up with pre-drilled holes in the top of the base cabinets.


When it is time to go to work, I just wheel out the base cabinets (more on that next, I promise!) and tilt the front slab onto the cabinets.  I put the bullets into the bottom of the slab first because the hole in the cabinet top goes all the way through so setting the top down could just knock the bullet through the top of the cabinet.  It was a little fussy to get the holes lined up perfectly between the slab and the base, so you may notice an extra hole on the left that I plugged up after the fact.


After the first slab is in place, I just get the second one up there and drop it in place.  The bullets are a little tight at first but after you use them a few times the fibers compress and the slabs just drop right in place.


With both slabs in place, the bench is very solid.  The top doesn't shift around at all, and the two slabs butting up together seems to really lock them in place.  The bases are pretty heavy, especially the one with the planer inside.  Even during aggressive hand planing, this bench doesn't move or slide around.


The only negative I have noticed is that the slabs may not sit fully down onto the bases, because my floor is not level in the garage.  There are a couple spots on my concrete floor that are really wacky, so there can be a small gap between the slab and the base cabinets, shown in the next picture.


This would be a problem with any bench, requiring me to level the feet to prevent rocking.  To account for the warped floor, I specifically made the base cabinets so that they will not rock on unlevel floors - but more on that next time.  The good news is that even with a small gap under the top slabs, the bench is still extremely solid and stable, just not always level.  I planned to use a deck of cards to shim up the top under the raised end, but in practice this doesn't seem to be needed.

So that's how I came up with the top for the bench, and how it works.  Next time, due to popular demand I'll show the bases and how the retractable wheels work.  Stay tuned!

I'm curious to know if anyone else has tried using LVL or another "wood product" for their bench top.  Come on Dyami, tell us about that Timberstrand!

Monday, November 22, 2010

Workbench: Beware the New

I have been hinting lately about the workbench I am building, but not giving many clues about the design.  Sorry for being so secretive, but I really wanted to make sure a few things worked out before going public in case these ideas were really foolish.  I have found that medium foolishness is fine, but "really" foolish should be avoided.

Like many others out there in the woodworking community I have devoured all the recent books about workbenches, particularly those by Chris Schwarz and the extended Pop Woodworking Staff.  It's hard to have a discussion about benches without relying heavily on their material.  I scoured the internet for plans, comparing Roubo with Nicholson, Moxon with Holtzappfel, $175 benches with 21st Century benches, and all the rest.  I wanted to take all the good features from all of those and blend them together into the bench of my dreams.

Then I did a little reality check, which I will share with you now.  There isn't space in my shop for a bench unless I get rid of some large tools. I'll never be a hand tool only woodworker and after all these years of looking strategically mopey before birthdays and anniversaries I sure can't tell my wife I'm getting rid of anything.

But don't take my word for it - take a look at this panoramic picture of my shop.


Many eagle-eyed viewers will sees something that could be removed to get a ton (or three) more space in the shop.  I'll wait while you try to find it.  Hint: It has the highest horsepower rating in the shop.

Alright, I should park the Buick elsewhere but life is a compromise.  We live in an old house downtown, and the only garage is under the house.  The car has to get parked inside, so the first rule of my shop is "everything on wheels".  The garage is 19' deep and about 16' wide so at least there is enough space to wheel everything out of the way when the car has to come back in.  I've been working on getting everything mobile and I'm about halfway done.  I still have plans for a miter saw cart and drill press cart on my to-do list.

As you can see, I also have several steel columns holding up the place.  They are perfectly positioned for maximum inconvenience, blocking the long wall where I have a countertop set up. Back to the workbench design, all this is just meant to show that space is an issue for me.  I want a full-featured bench but have nowhere to keep it.

I started reading about knockdown workbenches, but this doesn't mean the same to me as it does to most authors.  Most knockdown designs are meant to solve the "I might move someday and need to take my bench apart" problem.  I literally want to take my bench apart every night.

The last paragraph of Schwarz's newest workbench book inspired me to find a solution, and I hope he won't mind if I quote it here.  "What can I remove and still have all the functionality I need?  When I cannot remove anything else, it's time to start cutting wood."  Vises?  Don't need them - they are too heavy to hoist around anyway.  Legs?  Stretchers? Shelves?  Bah, who needs them.  After all, a bench is just a 3D clamping surface, right?  My design eventually devolved into nothing more than a top sitting on...something.  I think it works for me, but maybe others will like the concept too. 

Let's see.  Here's a shot of the long wall of the shop, once the car is out and the table saw is rolled away.


In the picture above, there are two mobile carts under that countertop.  They both have retractable wheels and can roll out into the shop.  The one on the left is a flip-top stand that holds my planer and the other is simply a stack of drawers.


Roll them out, lift the wheels and the two carts make a good base to support the workbench top.  The top is made of two separate beams that are 7 feet long and about 10 inches wide.  I used LVL for the slabs after seeing the "Gluebo" at Woodworking in America.  The extra rigidity of the LVL allowed me to get the top down to about 2 1/2" thick.


When it's time to stop for the evening, I am able to take the two top slabs and stand them in the corner.  Then I just roll the cabinets back under the counter and the bench is tucked away for the night.  The whole thing takes less than 5 minutes, including moving the table saw back over and driving in the car.

There's a lot more to share about this bench but this post is getting long and I suspect you may be shaking your head.  Coming soon, I will go into details about securing the top to the base cabinets, work holding accessories, and vise replacements.  Stay tuned for more!

Think I'm a visionary, or just plain nuts?  Either way, I'd love hearing what you think about the bench design.  See any work holding tasks that may be a problem for me?  Shout it out.

Tuesday, November 16, 2010

Workbench Detail: Dog Holes

I am in the camp that prefers round dog holes in a bench top.  Square holes require perfect planning and construction to get them in the right place.  I'm great at the first (planning) but kind of "meh" at the second.  Round  holes are easier to add after the top has been glued up, and they work with a lot of aftermarket accessories.  With my new bench I will be using a set of Bench Pups and a Wonder Pup, along with some Grammercy holdfasts and some 3/4 pegs for much of the workholding.  All of this works just fine with round holes in the bench.

Chamfering the holes is one of the details I latched onto while planning the bench.  This makes it easier to get accessories into holes by slightly widening the mouth.  It also helps prevent the hole from chipping out when you remove an accessory.  The LVL is particularly prone to flaking so this was an important detail.

Here is the before shot of a typical hole, made with a 3/4" forstner bit in a drill press.

Holes in LVL are prone to chip-out
And here is a hole after a very slight chamfer was added with a router.

Chamfer the hole to make it more durable
Of course, safety first even if it includes silly pink filters on your dust mask.

Pink = Safe
Sorry to be so stingy with the details on the bench design, but I will be adding more posts about my unique, new, and possibly foolish idea very soon!

Tuesday, November 09, 2010

Blast From the Past - Table Saw Enlarger

Some dilemmas just don't go away, as today's Blast From the Past proves.  How many times have we all realized that a tool was just not quite as good as we needed, and tried to improve it?

When I was just getting started in woodworking, my kind wife bought me a small table saw.  To my beginner's eyes, this $300 beauty was all the saw I would ever want.  I built some great projects with that small saw, and it was good way to dip my toes in the hobby before diving in.  Eventually though I came to realize that bigger saws had more to offer than my little direct-drive universal motor saw could provide.  I became expert at rattling off the benefits to my wife:  the added power of a larger motor, the extra weight of a larger saw to combat vibration, the accuracy of a better fence, the dust collection allowed by an enclosed base, and a larger table surface than my starter saw provided.  When a deal popped up, I eventually sold off the saw to a co-worker and upgraded to a Craigslist Grizzly cabinet saw.

In the meantime though, I did try to improve the performance of my starter saw.  There are a few good ways to do this.  Zero clearance inserts - though the small Delta I had used a weird 1/8" thick plate so I had to make my own.  A better blade was a no-brainer, and I became a fan of the Forrest Woodworker II, thin kerf version of course.  A blade stabilizer didn't hurt with the thin-kerf blade either.  Also, don't overlook the benefits of a good tune up to make sure the saw is aligned properly - miter slot parallel with the blade and fence dialed in just right.  I even flattened the arbor washer on a piece of sandpaper to squeeze every last bit of juice out of the saw.

One thing I thought about doing, but never got around to was making a larger enclosure for my small saw to sit in.  You may have seen these around the web, and even Norm himself made a version on The New Yankee Workshop.  This type of extended table enclosure adds table surface and mass to a small saw, and it could help with dust collection also. Fancy versions may even have a better fence, adding accuracy to the setup.

Proving that there aren't many new ideas, here is today's Blast From the Past - click for larger versions of the plans.

Click to Zoom
This table is designed to accept a very small saw - the opening is just 10"x13".  The larger surface of the enclosure is still just 24"x27", which just goes to show that saw sizes have grown over the years.  The plan efficiently uses just one sheet of plywood.  I would be tempted to make the top a little thicker, but maybe it's thick enough given how small and light that tiny saw must be.

Click to Zoom
While the exact dimensions in this plan are unlikely to be useful, the idea lives on today.  There is hope for small tools, and always a way to improve them.  Enjoy!

Did you have a similar experience with upgrading a "starter tool"?  Is there a tool you currently have that you want to improve?  Let's hear about it in the comments!

Friday, October 29, 2010

The Schwarz Effect: An Academic Rebuttal

First of all, wow.  Response to my previous post about Chris Schwarz and his effect on the market for No. 80 scraper planes has been amazing.  Thanks to Chris for spreading the word.

Gye Greene went a few steps further down the rabbit hole.  He asked for a copy of the data that fed my charts, and ran it through a series of statistical contortions to determine the true likelihood of a lasting "Schwarz Effect".  I had originally recorded a few extra details of each auction, such as the condition of the scraper, the shape of the casting (there are a couple varieties), and whether the blade was missing.  Gye included all of this in his methodology, and found that price was controlled more by these factors than by Schwarz' Mojo.  Gye did confirm my observation that even the crustiest piece of crap from the bottom of the ocean would sell in the post-Schwarz era.

So it seems that Schwarz has the power to stir us all up into a frenzy of buying every tool in sight, but not necessarily to make us overpay in the long term.  Shucks.

Gye's amazingly detailed analysis is available at this link, please check it out.  Thanks to Gye for taking the time on this!  A few of his key insights:
  • Expect to pay more for a scraper in the original box. This commanded about a $25 premium.
  • Early castings have a base with a straight trailing edge, instead of the later concave curved edge.  The straight version will run you almost $10 more at auction.
  • No blade?  Expect to pay about $11 less.
You may also want to check out Gye's blog over at gyegreene.blogspot.com for more Gye goodness!

Oh and in case anybody out there finds themselves in possession of a number 80 that needs a little rehab, you may find this post by Pickering Mike interesting over at Ramblings of a Novice Woodworker.

Think Gye and I are nutjobs?  Chris Schwarz does!  Tell us what you think in the comments!

Wednesday, October 27, 2010

Behold the Power of The Schwarz!

Oh, how nefarious the woodworking world can be!  What you are about to read is a tale filled with intrigue, secrecy, arbitrage, and data analysis.  What else do you need?  Hollywood, I will be expecting your call.

A couple weeks ago, Chris Schwarz blogged about his Stanley #80 scraper plane.  As usual, it was a thoughtful and instructive post that described the advantages of these simple tools.  It was nice reading for a Monday.

A nice Stanley #80 scraper plane
What only a lucky few knew, however, is that "The Schwarz" had previously set up a little experiment in arbitrage, woodworking style.  In the final session on the final day of Woodworking in America, Chris offered a bonus to the group.  He said that you could buy the #80's for $20 all day long on eBay, at least until he blogs about them.  Those in the room had one week to corner the market on these tools and then the public would hear about them via the blog, likely sending prices into the stratosphere.

Shall we see how the power of the Schwarz may be used for evil instead of for good?  The following chart takes a look at sales prices on eBay for the past month or so.  Each bubble is a single sale.  The total delivered price is along the left axis, and time marches out along the bottom axis.  The bubble size indicates how many bids the auction had - more bids get larger bubbles.

Click for larger version

As you can see from the chart, things were cruising along steadily in "The Good Old Days".  Average shipped price for a #80 was about $26, and things were good.  Then on October 3rd Schwarz made his speech at WIA, and the sharks smelled blood in the water.  I only have data up until the 5th because I forgot to check and eBay cleans house after 21 days, but even in the 3 days after WIA the average shipped price went up to almost $38.  After his blog post on October 11, Schwarz generated enough demand to drive the average shipped price up again to $41.51, a 60% increase over "The Good Old Days"!


Do you need further proof of the power of the Schwarz?  From 9/22 to 10/5 there were another 12 auctions that had zero bids and therefore did not end in a sale.  Buyers weren't interested in these planes, so these listings were not included above.  Since Chris made his blog post on Oct 11 there have been no unsold scraper planes on eBay.  All auctions have ended successfully in a sale, including the gem pictured below with the absurdly optimistic description "has light rust" which sold for $24.95 shipped.


Click for larger version

What does this teach us?  Chris has the Mojo, baby.  One comment from him is enough to send literally tens and tens of people into a buying spree.  Oh, and I have too much time on my hands. On a related note, I will be starting a new hedge fund soon trading under the ticker symbol SWRZ.  Operators are standing by!
 
Care to comment?  You would be among a select few who take advantage of this once in a lifetime opportunity!
 
Footnote:  In case you are as into data geekery as I am, here is the fine print on the methodology:
  • I used the search term "Stanley scraper 80" to bring up closed auctions on eBay.
  • I only included auctions for a single tool, no bundles were allowed.
  • Only sales were counted, so auctions with no bids were excluded.
  • The price reported is the shipped price of the tool, including final bid price plus shipping cost.  I did look at the results without shipping costs and the conclusions were the same.
  • Only sellers in the US were included.
  • A few tools were sold without blades, and I kept these in the data.
  • A single bid typically means the "buy it now" feature was used.

Saturday, October 16, 2010

Oh no, not another one!

Savvy woodworkers from all over the blogosphere will take one look at the pictures below and think to themselves:  "Why?  Haven't we seen enough blog posts on this topic?"


 Nope.


Want to make me stop, or at least slow me down a bit?  Leave a comment for me to read!

Friday, October 15, 2010

Major Let Down

I am not embarrassed to say that I have been strutting around town bragging about my performance in the Crosscut event at the 2010 Hand Tool Olympics, held at the WIA conference a couple weeks ago.  As evidence of my skills, I was awarded this fine saw as a trophy.


Imagine my shock, the depth of my dismay and grief to discover that prizes were awarded to some participants (me!) based on random chance!  Apparently the powers that be gave 2 prizes, one to the highest performer and one raffled off to a participant in each event.

Aww, crap.

The silver lining is that most folks didn't know what I was talking about in the first place, so they literally couldn't care less.  So really, there's no need to chase down all those announcement cards I mailed out, is there?